
A compliant, workflow-driven medical office buildout requires coordinated design, specialized MEP systems (medical gas, HVAC zoning, dedicated electrical), rigorous permitting, and a contractor who has built clinical space before. Budget $120–$400+ per square foot depending on your specialty and the shell condition of the space, and plan for a 4–9 month project timeline from lease execution to occupancy. That range widens significantly for imaging suites, ambulatory surgery centers, or any space requiring structural reinforcement.
Three things to do before anything else:
- Hire a medical-space architect or clinic planner with documented experience in clinical tenant improvements (TIs), not just commercial office work.
- Secure a written TI scope from your landlord tied to actual drawings, not a dollar-per-square-foot allowance with no defined deliverables.
- Lock your critical equipment specifications (imaging, dental, surgical) before the architect submits construction documents for permit, because late equipment changes are the single most expensive rework trigger on any clinical project.
Standards that will govern your project: ADA (accessibility), NFPA 99 (medical gas and life safety), and the FGI Guidelines (Facility Guidelines Institute), which set minimum room sizes, sink placement, and ventilation requirements for healthcare facilities. Local health department plan review adds another layer on top of those.
Key Takeaways
A successful medical office buildout requires locking equipment specs, landlord scope, and team composition before design begins — every major cost overrun traces back to one of those three gaps.
| Point | Details |
|---|---|
| Budget by specialty | Expect $120–$400+/sq ft depending on specialty and shell condition; imaging and surgical suites sit at the top of that range. |
| Freeze equipment early | Lock clinical equipment specs before construction documents begin; late changes force MEP revisions and permit re-submittals. |
| Plan for permit layers | State health department reviews add 30–60 days beyond standard building permits; plan for this in your lease commencement date. |
| Negotiate TI with drawings | A landlord TI scope tied to actual drawings protects you; a lump-sum allowance with no defined scope almost always leaves a gap. |
| Ardorcre advisory | Ardorcre helps Charlotte MSA medical tenants model effective rent, negotiate TI scope, and structure leases before the leverage window closes. |
Table of Contents
- What does a medical office buildout look like phase by phase?
- Who do you need on your project team, and when?
- How do code and clinical workflow requirements shape your design?
- How much does a medical office buildout cost?
- What does the permitting process look like, and what causes delays?
- What are the most common and costly mistakes in medical buildouts?
- How do you evaluate and hire the right contractor?
- What are the specialty-specific requirements you cannot overlook?
- How do site selection and lease terms affect your buildout feasibility?
- Preconstruction checklist and sample project templates
- What patterns does Ardorcre see in medical tenant projects?
- Ardorcre helps medical tenants reduce timeline and budget risk
- Sources
What does a medical office buildout look like phase by phase?
A structured, phase-by-phase planning approach reduces rework, prevents approval failures, and keeps your contractor from pricing a moving target. Each phase has specific deliverables. Miss them, and you pay for it later.
The seven phases and their deliverables
-
Pre-design / site selection (Weeks 1–4): Feasibility study, measured drawings of candidate spaces, zoning and CON review, utility capacity check, preliminary equipment list, and a provider-to-exam-room ratio analysis. This is when you confirm the space can physically support your clinical program.
-
Programming (Weeks 3–6, overlaps pre-design): Room-by-room space program documenting every function, headcount, equipment footprint, and adjacency requirement. The output is a net-to-gross square footage target that drives lease negotiations.
-
Schematic design (Weeks 5–10): Bubble diagrams and preliminary floor plans showing public/clinical/back-of-house zones, nurse station placement, exam room count and orientation, and a first-pass MEP narrative. No permit-ready drawings yet, but enough to validate the space works.
-
Design development (Weeks 9–16): Developed floor plans, reflected ceiling plans, preliminary MEP drawings, medical gas routing plan, finish schedule, and equipment schedule. This is the last realistic point to make major layout changes without significant cost consequences.
-
Construction documents (Weeks 14–22): Permit-ready drawings and specifications covering architectural, structural, MEP, medical gas, fire protection, and finish details. Includes equipment cut sheets integrated into the drawings. Submit for building permit and any specialty reviews at the end of this phase.
-
Bidding and negotiation (Weeks 20–26): Issue drawings to qualified GCs, receive and level bids, clarify scope gaps, and execute a contract. Expect 3–6 weeks for a thorough bid process on a clinical project.
-
Construction, inspections, and commissioning (Weeks 24–52+): Rough-in, above-ceiling MEP, medical gas rough-in and pressure testing, drywall, finishes, equipment installation, final inspections, medical gas certification, and certificate of occupancy. Staff orientation and operational readiness wrap up the commissioning phase.
| Phase | Typical Duration | Critical-Path Items |
|---|---|---|
| Pre-design / site selection | 2–4 weeks | Equipment list, measured drawings |
| Programming | 2–4 weeks | Room program, provider ratios |
| Schematic design | 4–6 weeks | Zone layout, MEP narrative |
| Design development | 5–8 weeks | Equipment schedule freeze |
| Construction documents | 6–10 weeks | Permit submission, MEP specs |
| Bidding / negotiation | 3–6 weeks | Bid leveling, contract execution |
| Construction / commissioning | 12–26+ weeks | Med gas cert, CO, staff training |
Freeze equipment specs no later than the end of design development. Permit submissions require equipment cut sheets integrated into MEP drawings. A late equipment change after construction documents are issued typically means revised drawings, re-submittal fees, and a permit-review restart.
Who do you need on your project team, and when?
The team for a clinical buildout is larger than most practice owners expect. Hiring the wrong person at the wrong time is one of the most reliable ways to add cost and weeks to a project.
Hire sequence
-
Tenant/owner-rep broker (before site selection): A broker who specializes in medical tenant representation protects your interests in lease negotiations and helps you evaluate TI allowances against actual buildout costs. Hire before you tour spaces.
-
Medical-space architect (before or immediately after signing a letter of intent): The architect drives programming, coordinates with engineers, and manages permit submissions. Engaging them after lease execution wastes the pre-design window.
-
MEP engineers (engaged by the architect at schematic design): Mechanical, electrical, and plumbing engineers size HVAC systems, design medical gas distribution, and specify electrical service. They must be brought in early enough to influence the structural and architectural layout.
-
Structural engineer (at design development, if needed): Required for imaging equipment (MRI, CT), heavy dental chairs with floor anchoring, or any slab penetration for below-grade plumbing.
-
Medical equipment coordinator (before construction documents): Coordinates vendor-supplied equipment specs, power and data requirements, and installation timelines with the design team. Without this role, equipment specs arrive late and force MEP revisions.
-
General contractor (at or before bidding): Ideally, a GC with documented medical TI experience. Some practices use a design-build delivery model, which compresses the schedule by overlapping design and construction phases.
-
Specialty consultants as required:
- Infection-control advisor (for procedure rooms, ASCs, or any space with immunocompromised patients)
- Radiation safety officer (for imaging suites)
- Medical gas / mechanical subcontractor (NFPA 99-certified installer)
- Life-safety / fire marshal liaison (for larger facilities or complex occupancy classifications)
How do code and clinical workflow requirements shape your design?
Layout decisions in a medical office are not aesthetic choices. They are driven by code minimums, infection-control logic, and patient-flow efficiency. Getting them wrong at the design stage means either a plan-review rejection or a space that fights your staff every day.
Building codes for healthcare facilities differ materially from standard commercial office codes, and the gap is widest in three areas: room sizing, plumbing, and ventilation. The FGI Guidelines set minimum exam room clear floor area (typically 80–120 sq ft net, depending on the procedure type and state adoption), require handwashing sinks in every exam room, and specify minimum corridor widths (typically 44 inches for patient corridors, wider for stretcher access). Some states enforce these minimums strictly — in Texas, for example, the Department of State Health Services mandates minimum exam room dimensions and in-room sinks, and a plan that omits them is rejected outright.
Clinical flow zoning
Divide the floor plan into three zones before placing a single room:
- Public zone: Reception, waiting, restrooms, check-in/check-out. Patients and visitors stay here.
- Clinical zone: Exam rooms, treatment rooms, nurse station, medication room, clean and soiled utility. Staff and patients share this zone under controlled access.
- Back-of-house zone: Provider offices, break room, storage, IT/server room. Staff only.
Nurse station sightlines matter. The station should have a direct line of sight to the clinical corridor and, where possible, to the waiting area. Exam rooms sized at 100–120 sq ft give providers enough clearance to work on either side of the exam table, which is the minimum for most outpatient specialties. Room-by-room sizing calculators tied to provider FTE counts and visit volume are the most reliable way to translate your clinical program into a square footage target.
MEP and infection control
HVAC zoning is frequently underestimated. Procedure rooms, soiled utility rooms, and restrooms require dedicated exhaust, and the supply/exhaust balance must meet FGI and ASHRAE 170 requirements for air changes per hour. Inadequate HVAC coordination often forces expensive mid-project upgrades when the mechanical contractor discovers the base-building system cannot support the clinical loads.
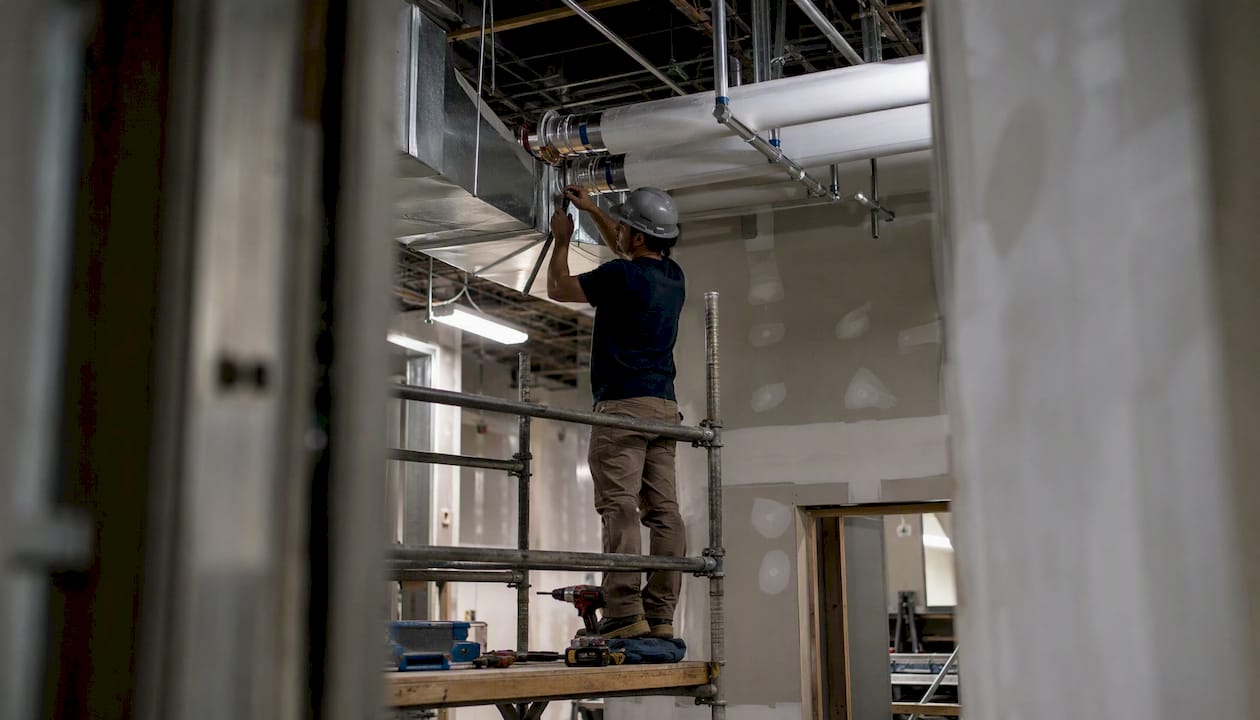
Medical gas routing (oxygen, vacuum, nitrous where applicable) must be designed by a licensed engineer and installed by an NFPA 99-certified contractor. Outlets must be located at each exam room, procedure room, and recovery area per your clinical program. Service sinks (clinical sinks, not standard hand-wash sinks) belong in soiled utility rooms and procedure rooms.
Pro Tip: Freeze your equipment list and MEP specifications before the architect begins construction documents. Every piece of clinical equipment has power, data, plumbing, and sometimes structural requirements. A late equipment substitution after CDs are issued typically requires revised MEP drawings, structural re-analysis, and a permit re-submittal — adding weeks and cost that dwarf the price of the equipment change itself.
How much does a medical office buildout cost?
Cost is specialty-driven. A primary care clinic in a warm shell runs very differently from a dental suite or an imaging center, and the gap between them is not marginal.
Regional buildout costs commonly run $120–$400+ per square foot for clinical tenant improvements, with the low end representing basic primary care in a well-conditioned shell and the high end covering surgical or imaging buildouts with heavy MEP, shielding, and specialty systems. Charlotte-area projects generally track within that national band.
Primary cost drivers
- Medical gas systems: Piping, outlets, zone valve boxes, and alarm panels. Costs scale with outlet count and gas types.
- Imaging shielding: Lead-lined walls and doors for X-ray, CT, or fluoroscopy rooms. Structural reinforcement for MRI magnets adds further cost.
- HVAC zoning: Dedicated air-handling units or VAV systems for clinical zones, exhaust fans for procedure and soiled utility rooms.
- Electrical service upgrades: Imaging equipment, sterilizers, and dental chairs draw significant amperage. Many shells require panel upgrades or new service.
- Plumbing: Exam-room sinks (one per room per FGI), clinical sinks, sterilizer connections, and floor drains for procedure rooms.
- Specialty millwork and casework: Built-in cabinetry, nurse station counters, medication room millwork.
- FF&E and equipment: Exam tables, chairs, sterilizers, imaging equipment, and IT/AV systems. Often budgeted separately from construction but must be coordinated with it.
Sample budget split by category
The more specialty systems involved, the more exposure you carry to mid-project scope changes.
TI allowance mechanics
A landlord TI allowance is a credit against your buildout cost, typically expressed as dollars per square foot. To compare offers from different landlords, amortize the TI across the lease term and add it to the effective monthly rent. A $60/sq ft TI on a 10-year lease is worth $6/sq ft/year — which may or may not offset a higher base rent. Negotiation levers beyond the TI dollar amount include rent abatement during construction, CAM exclusions for capital items, and landlord responsibility for base-building systems (roof, HVAC, electrical service to the suite).
Review your lease abstract carefully to confirm which base-building systems the landlord warrants and which become your responsibility at lease commencement. Gaps in that language are where budget surprises originate.
What does the permitting process look like, and what causes delays?
Permitting for a medical office buildout involves more review layers than a standard commercial TI, and each layer has its own timeline.
Typical permit reviews
- Building permit: Architectural, structural, MEP, and fire-protection drawings reviewed by the local building department. The primary permit for construction.
- Fire marshal review: Life-safety systems, egress, fire suppression, and occupancy classification. Often runs concurrently with building permit review.
- Local health department review: Required in many jurisdictions for outpatient healthcare facilities. Scope varies by state and municipality.
- State health department review: Required in some states for licensed healthcare facilities (clinics, ASCs, imaging centers). This is the review that most commonly extends timelines.
- Radiation safety review: Required for any space with X-ray, CT, fluoroscopy, or nuclear medicine equipment. Involves a physicist’s shielding report and regulatory approval.
- Medical gas certification: Post-installation pressure testing and certification by a qualified verifier per NFPA 99 before the system can be used clinically.
State health department reviews can add 30–60 days to a project timeline compared with standard commercial permitting. That is not a worst-case estimate — it is the common experience for outpatient facilities in states with active health facility licensing programs.
Common delay causes and mitigation
The three most reliable delay triggers are late equipment specifications, plan-review comments requiring drawing revisions, and tenant-landlord scope disagreements discovered after permit submission.

Pro Tip: Request a pre-submittal meeting with the local building department and, where applicable, the state health department before submitting construction documents. Many jurisdictions offer pre-application conferences that surface major comment items before the formal review clock starts. One meeting can save four to six weeks of back-and-forth.
Front-loading decisions and locking project governance early reduces delay risk on complex projects. In practice, that means having your equipment list, landlord scope letter, and MEP narrative finalized before the architect begins construction documents — not after.
What are the most common and costly mistakes in medical buildouts?
Most expensive surprises in a clinical buildout trace back to decisions made (or skipped) in the first 30 days of a project.
-
Signing a lease without pre-design: Committing to a space before an architect has confirmed it can support your clinical program is the highest-risk move in the process. Column spacing, slab thickness, ceiling height, and utility capacity can all disqualify a space that looks fine on a floor plan.
-
Understating plumbing and medical gas scope: Practices routinely underestimate the number of sinks and gas outlets required by FGI and state rules. Discovering mid-construction that you need six more exam-room sinks than the budget assumed is a five-figure problem.
-
Under-sizing the waiting area: A waiting room sized for 10 patients in a practice that will see 25 patients per provider per day creates operational problems from day one. Use your projected visit volume and provider count to size waiting correctly during programming.
-
Failing to plan MEP loads: Imaging equipment, sterilizers, and dental chairs draw electrical loads that many base-building panels cannot support. Discovering this during bidding, rather than during site selection, means either a costly electrical upgrade or a space that cannot support your equipment.
-
Ignoring state health or specialty licensing reviews: Some practices learn about state health department plan review requirements after their building permit is already submitted. That sequence adds months, not weeks.
Quick validation checklist before signing or breaking ground:
- Architect has confirmed the space can support your clinical program (ceiling height, column spacing, slab, utilities)
- Equipment list is at least 80% complete and shared with the MEP engineer
- Landlord TI scope is in writing and tied to drawings, not just a dollar figure
- State and local health department review requirements are identified and planned for
- Contingency budget is set at 10% minimum (15% for specialty buildouts)
- Medical gas contractor is identified and NFPA 99-certified
How do you evaluate and hire the right contractor?
The fastest way to identify a qualified GC for a clinical buildout: ask for a list of completed medical TI projects with contact references, and call them. A contractor who has built exam rooms, installed medical gas, and navigated health department plan review will talk about those experiences specifically. One who has not will give you generalities.
Interview questions for GC candidates
- How many medical or clinical TI projects have you completed in the last three years, and what were the specialties?
- Who is your NFPA 99-certified medical gas subcontractor, and have you worked with them on prior projects?
- How do you coordinate MEP and equipment vendors during construction?
- What is your change-order process, and what percentage of your medical projects finish within 5% of the original contract value?
- Have you worked with [state health department] plan review before? What was the outcome?
- What is your safety record (EMR rating) for the last three years?
Contract clauses to insist on
- Defined scope with landlord/tenant responsibility matrix: Every line item must be assigned to either the landlord or the tenant. Ambiguity here is where budget disputes originate.
- Fixed-price or GMP (Guaranteed Maximum Price) contract: Avoid time-and-materials contracts for clinical buildouts. The complexity is too high.
- Clear change-order process: Written authorization required before any out-of-scope work begins, with pricing submitted within 48 hours of the request.
- Milestone schedule with liquidated damages or incentives: Tie payment milestones to construction progress, not calendar dates alone.
- Warranty and closeout deliverables: O&M manuals, as-built drawings, medical gas certification documents, and equipment warranties must be delivered at substantial completion.
Red flags: A GC who is unfamiliar with NFPA 99, has no defined equipment coordination process, cannot name their medical gas subcontractor, or submits a bid significantly below the field without a detailed exclusions list is telling you something. An unusually low bid on a clinical project almost always means scope is missing.
What are the specialty-specific requirements you cannot overlook?
Each specialty adds infrastructure requirements that a general commercial contractor may not anticipate. Plan for these before programming is complete.
-
Dental: Compressed air (oil-free, medical-grade), dental vacuum, nitrous oxide and oxygen medical gas, lead-lined walls for X-ray rooms, floor-mounted chair anchoring, and cabinetry designed for dental equipment integration. Electrical loads per operatory are higher than a standard exam room.
-
Imaging (X-ray, CT, MRI, fluoroscopy): Physicist-designed radiation shielding (lead or concrete), structural floor reinforcement for CT and MRI weight, dedicated high-voltage electrical service, MRI-compatible HVAC and quench vent, and a radiation safety officer engaged during design. Timeline and cost implications are significant — imaging rooms routinely add $150–$300/sq ft to the affected area.
-
Ambulatory surgery centers (ASCs): Laminar airflow in OR suites, PACU (post-anesthesia care unit) with nurse station sightlines, CMS Conditions of Participation compliance, medical gas at every OR and PACU bay, and state ASC licensure review (which is separate from and in addition to standard building permitting). ASC buildouts are at the top of the cost range.
-
Labs (CLIA-certified): Dedicated plumbing for lab sinks and eyewash stations, chemical-resistant casework, exhaust ventilation for fume hoods, and CLIA compliance documentation. Coordinate with your CLIA consultant before finalizing the lab layout.
-
Aesthetics / med-spa: Local anesthetic waste disposal, sharps handling infrastructure, appropriate ventilation for laser procedures, and state-specific licensing requirements for the services offered. Simpler MEP than surgical or imaging, but licensing and disposal compliance are non-negotiable.
How do site selection and lease terms affect your buildout feasibility?
Site selection and lease economics often determine whether a buildout is financially viable before a single drawing is produced. The right space in the wrong lease structure can make a project unfeasible even at a reasonable construction cost.
Site-selection checklist:
- Exam-room count mapped to gross square footage (use provider-to-exam-room ratios and a room-by-room calculator to validate)
- Parking ratio and ADA-accessible spaces (medical uses typically require more parking than standard office)
- Column spacing (wide bays allow flexible exam-room layouts; narrow bays constrain them)
- Slab thickness and condition for below-grade plumbing penetrations
- Electrical service capacity at the panel
- Ceiling height (9 feet minimum for above-ceiling MEP routing; 10+ feet preferred)
- Zoning and Certificate of Need (CON) requirements where applicable
- Proximity to referral networks, hospital campuses, and patient catchment area
- Expansion options within the building or on the site
For Charlotte MSA context, local office market conditions affect both available inventory and landlord negotiating posture on TI allowances. Understanding current vacancy rates and absorption trends gives you leverage at the negotiating table.
TI negotiation checklist:
- Request a landlord TI scope letter tied to actual drawings, not a lump-sum allowance
- Negotiate rent abatement for the construction period (typically 2–4 months)
- Calculate amortized TI value (TI dollars ÷ lease years) to compare offers on an effective-rent basis
- Cap CAM charges or exclude capital items (roof, structural, HVAC replacement) from CAM
- Document landlord responsibility for base-building systems in the lease
- Confirm who owns the improvements at lease expiration (restoration obligations can be costly)
When to hire an advisory broker: Always. A tenant who negotiates directly with a landlord’s agent is negotiating against someone whose fiduciary duty runs to the other side of the table. A tenant-rep broker costs you nothing in most markets (the landlord pays the commission) and typically recovers multiples of their fee in TI and rent concessions. Review the NNN lease mechanics before signing any triple-net lease so you understand your full occupancy cost exposure.
Preconstruction checklist and sample project templates
Use this checklist before issuing an RFP or executing a construction contract.
Feasibility and pre-design:
- Feasibility study complete (space can support clinical program)
- Measured drawings of candidate space obtained
- Zoning and CON review complete
- Equipment list at least 80% finalized
- Provider-to-exam-room ratio validated
- Preliminary budget prepared with 12–15% contingency
Landlord and lease:
- TI scope letter executed and tied to drawings
- Rent abatement period confirmed in writing
- Landlord/tenant responsibility matrix drafted
- Base-building system warranties documented
Design and permitting:
- Architect and MEP engineers contracted
- Equipment coordinator engaged
- Permit submission strategy confirmed (pre-submittal meeting scheduled)
- State health department review requirements identified
RFP and bidding:
- RFP issued to minimum three qualified GCs
- Required documents from bidders: project list with medical references, NFPA 99 subcontractor name, insurance certificates (minimum $2M general liability, workers’ comp), bonding capacity, and detailed bid with allowances and exclusions listed separately
- Bid leveling complete before contract award
Sample preconstruction timeline
| Activity | Typical Duration |
|---|---|
| Site selection and LOI | 2–4 weeks |
| Lease negotiation and execution | 3–6 weeks |
| Pre-design / programming | 2–4 weeks |
| Schematic design | 4–6 weeks |
| Design development | 5–8 weeks |
| Construction documents | 6–10 weeks |
| Permit review | 4–12 weeks (specialty-dependent) |
| Bidding and contract | 3–6 weeks |
| Construction | 12–26+ weeks |
Sample budget worksheet
What patterns does Ardorcre see in medical tenant projects?
The three decisions that most affect a medical buildout outcome are the lease terms negotiated before design begins, the point at which equipment specifications are frozen, and the composition of the project team at the start. Everything else is downstream of those three.
The gap is not a surprise to anyone who has done this before. It is entirely preventable with a pre-design feasibility study and a landlord scope letter tied to drawings before lease execution.
A second pattern: equipment decisions get deferred because the practice is still evaluating vendors. The architect finishes construction documents with placeholder specs, the permit is submitted, and then the actual equipment arrives with different power, structural, and plumbing requirements. The result is revised drawings, re-submittal, and a 6–8 week permit delay that pushes the opening date and creates rent exposure on a space the practice cannot yet use.
Practical steps you can apply immediately:
- Before touring spaces, have your architect prepare a one-page clinical program summary (room count, equipment list, MEP narrative) so you can evaluate spaces against real requirements, not intuition.
- Ask every landlord for a base-building condition report before negotiating TI. Knowing the age and condition of the HVAC, electrical service, and plumbing before you negotiate is worth more than any single concession.
- Get three GC bids, level them against the same scope, and call two references per bidder who had a similar specialty buildout. The reference calls take 20 minutes and routinely surface information that changes the selection.
Ardorcre helps medical tenants reduce timeline and budget risk
Medical tenants in the Charlotte MSA face a specific challenge: the gap between what a landlord’s TI allowance covers and what a clinical buildout actually costs is rarely visible until design is underway. By then, the lease is signed and the leverage is gone.
Ardorcre works with medical practice owners and healthcare tenants on site selection, TI negotiation, and lease advisory before that window closes. The firm’s advisors model effective rent against actual buildout costs, negotiate landlord scope letters tied to drawings, and help practices avoid the lease structures that create budget exposure mid-project. That combination of real estate and project-economics expertise is what separates a well-structured medical lease from one that looks competitive on paper and costs significantly more in practice.
If you are evaluating spaces in the Charlotte MSA or preparing to negotiate a medical TI, contact Ardorcre for an introductory advisory call. Review your lease abstract with an advisor who understands clinical buildout costs, and start the conversation before you sign. Reach the team at Ardorcre.
Sources
- Understanding building codes — NIST
- First impressions: medical facility planning — Ontario Medical Association (OMA) planning guide (PDF)
- Medical Office Setup Guide — We Build Charlotte